Useful Stuff to Know » Home Page

How to Record Clear Audio

Tired of computer fan-noises, clicking, buzzing, drop-outs, hissing in your recordings? You can get clear good-sounding audio without needing a full recording studio.

First some DON’Ts:

  • Don’t use the internal microphone on laptops. They are poor quality and way too close to the computer fan and hard drive.
  • Don’t use the “mic in” jack on your computer. It goes to a low quality hissy pre-amplifier that muddles your sound.
  • Don’t use those skinny pencil-shaped “computer microphones” whether they connect via USB or 1/8” plug. They’re fine for voice chatting, but are too shoddy for music and good voice recordings.

Here are the key things to do, to get clear recordings:

1) Get a real microphone

By “real”, I mean the kind with a 3-pin XLR connector. You’ll need an XLR cable as well to hook up the mic. The advantages of XLR is that the mic cable is immune to electrical interference and can send pristine signals over long cable lengths. So you get better cleaner sound.

There are two main types of microphones: condenser and dynamic.

Condensers are more sensitive and clearer, but also pick up more background room sounds, and they sound more open and transparent.

Dynamics are more rugged and tend to stay focused on the sounds closest to them, but sound a little more stuffy and up close. They are also more picky about what audio interface you use (mentioned below) because they require more amplification/gain.

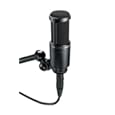
I recommend dynamics only if background room noises including boxy sounding echoes off the walls are a problem, or if you need the sound of a dynamic like the SM57 for guitar amp recording. Look into Sennheiser, Audio Technica, and Shure for dynamics. Avoid any ones under $50 … generally the ones from $75 – $120 are excellent while $120-$250 are luxury.

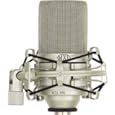
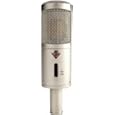
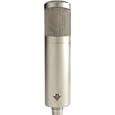
Condensers truly are better. A cheap condenser will have a wider frequency range than an expensive dynamic. They sound more pristine, and are best for vocals, acoustic guitar, and piano. Look up ratings and reviews before you buy.

Some condenser recommendations:


MXL 990 condenser – only $50. A bit on the trebly/tinny side, which can be fixed through EQ.


Audio Technica AT2020 – next step up for $75. I’ve had great results with this one.


Studio Projects B1 – next step up for $115.


Studio Projects C1 – Next step up for $250.

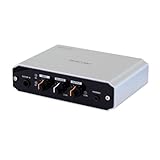
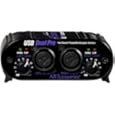
2) Get a USB audio interface

This is the key. These boxes connect via USB to you computer, and let you plug in your dynamic or condenser mic. Unlike typical computer sound-cards, they have better amplifier circuitry and inputs.

Some recommendations:


Tascam US-100 – If you’re on a budget. $75, single channel. Gain: 60dB.


Art USB Audio Interface – Pretty good for $99. Single Channel. Gain: 48dB.


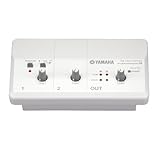
Yamaha Audiogram 3 – Very good, $119, single channel. Gain: 44 dB.


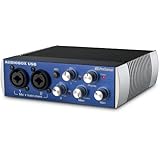
Presonus AudioBox – Dual channel, $145. Gain: 35dB (not high enough for dynamics). Excellent for condensers.

Tips

The quality of the sound going into the microphone is what matters most. This is determined by:

1) The sound source itself. Good or bad voice, powerful or tinny guitar amp, articulate or muddy guitar pickups.

2) The microphone positioning relative to sound source and the room. Adjust it until it sounds right. Keep it away from walls. Too close to the sound source and it gets boomy. Too far away and it gets tinny.

3) The room itself. Small echoey rooms are horrible, as are closets. Best to record in your largest room with clothes, furniture, bookshelves, anything to absorb sound.

4) Background room noises. The computer fan and hard drive clicking, outside traffic, neighbors yelling, aliens tapping on your window, etc… Record as far away from the computer as possible, or put the computer in a closet (make sure it has room to breathe, otherwise it will overheat).

If you simply cannot record in a quiet place, then avoid condensers and go with a dynamic microphone with a cardioid or hyper-cardioid sound pattern, and make sure your audio interface has up to -45 dB gain to drive it. If you need a recommendation, then I say go with the Shure SM58, or if money’s tight then an SM48 for half the cost of the 58.

The above mic and interface recommendations are for budget recording. It’s the minimum needed to get good clear sound, provided the audio going into the mic is good. You can use software compressors, de-essers, EQ, and plate reverb to make up for any of their shortcomings. It’s better to record dry (free of echoes, natural room reverb) and add effects afterwards.

Anything cheaper than these recommendations will have muddiness, unacceptable hissing, and so on. Anything more expensive and you’re paying more for extra reliability, extra features, and audiophile type marginal improvements. Do it if you have the cash, but please understand that more accurate recording of an audio signal doesn’t make up for a bad signal to begin with.

If you can’t get good clear sound with the above budget items, then the problem lies elsewhere and throwing more money into luxury interfaces and thousand dollar mics would be a waste. Then I would recommend improving what’s going into the mics. Sound engineering is where it’s at.

So, with $150-$300 for an interface and mic (and stand and cable) you can get 80%-90% the quality of pro-level recordings. To the average person they will sound indistinguishable. I know because I have done it, using just a Presonus Audiobox interface and AT2020 condenser — the rest being done through sound engineering and post-processing.

Boost Your Energy in 15 Seconds and Lose Weight

Do you get sugar crashes after eating carbs? Do you feel like taking a nap after eating dinner? Do you get lethargic on warm afternoons? Does reading a book make you tired?

Try some deep breathing. That’s right, oxygen is necessary for turning food calories into energy. You need oxygen to burn calories, which is pretty much the same process that happens when wood burns; its chemically stored calories turn into heat and light.

If your breathing is shallow, you don’t have enough oxygen to go with the calories in your digestive system. Guess what happens to those calories? They get turned into fat for storage. Thus if you are a shallow breather, you probably have some issues with belly fat.

Think of it this way. If you eat something high in calories, something that releases lots of sugar into your blood, but the oxygen is lacking, then insulin will get to those sugar molecules before the oxygen does, turning them into fat instead of energy. Thus if you eat and then feel sluggish, like taking a nap, that’s a sign that what you just ate is being turned into fat. Eating + fatigue = getting fatter. It’s your metabolism slowing down.

So to speed up your metabolism, breathe more. Whenever you notice yourself taking shallow breaths (usually while concentrating, especially when on the computer) take several deep breaths. That is, exhale completely, inhale gently with your belly until your chest starts to rise, then let it out. Like taking nice big breaths of fresh mountain air. If you suddenly get dizzy, that means you breathed too much too fast. Back off a little.

Within fifteen seconds you should notice a rush of energy, maybe even a brief flash of sweat, as those calories are oxidized and turn into energy and heat in your body. That’s calories now that won’t end up on your belly, butt, and thighs.

You can gauge the speed of your metabolism by how much energy you have. If you’re prone to getting tired and sleep a lot, aside from health problems your metabolism could be slow. Breathing more often throughout the day will give you energy and thus speed up your metabolism, which burns more fat.

Another thing you can do is split your three meals in half, and eat each half every two or three hours. So instead of three large meals, try six smaller ones. Or perhaps three medium or small meals with three snacks in between. This takes the burden off your body of having to cope with a lot of food at once. And that means less stress on the body and more energy for you.

Thus breathing more and eating smaller meals more often will speed up your metabolism and help you lose weight.

If you are intent on losing weight, you’ll want to cut back 500 calories of carbs from your daily meals. Basically cut your carbs in half. If you normally eat two slices of toast, eat only one. If you eat a cup of mashed potatoes, eat only half. But keep your protein and fat intake at healthy levels, it’s the carbs that need to be reduced since they are what spike blood sugar and lead to quick calorie surpluses that easily turn into fat and create sugar crashes. If you cut your calories too much, your body will think it’s starving and slow down the metabolism while trying to conserve fat as much as possible to weather the next drought.

[One more tip: beware what estrogen will do to your body. Too much will cause rapid weight gain, belly fat, and muscle loss. Highest sources of estrogen in foods include: soy milk, soybean oil, soy protein, butter, cheese, and milk other than skim. Try olive and coconut oil instead of soy and dairy fats. It’s ridiculous how much estrogen milk, soybean oil and butter contain. Guys who get too much soy and/or dairy will grow man-boobs].

So aside from breathing and smaller but more frequent meals, losing weight benefits from slightly reduced carb intake and then daily exercise.

But if you just want an energy boost, remember to breathe deeply for fifteen seconds minimum. Repeat as necessary to prolong your energy boost. If done moderately and without hyperventilating, this is especially effective for getting a boost while driving, studying, reading, writing, anything that might leave you tired from being physically inactive. If exercise can’t burn those calories, then breathing more will.

DIY Shampoo, Conditioner, Toothpaste, Moisturizer for CHEAP

The simplest and cheapest household ingredients can replace expensive grooming products. Here is what works:

  • Shampoo – all you need is a bar of soap. Say goodbye to sodium lauryl sulfate and tons of other chemicals. A simple bar of soap takes the place of shampoo. Glycerin soap works great. Ivory is fine. Something with very few ingredients. Avoid harsher soaps like Dial or Irish Spring.
  • Conditioner – all you need there is some vinegar diluted in double the amount of water. After shampooing, dump the vinegar solution into your hair, let sit for 30 seconds, and rinse off. After your hair dries, the vinegar smell will be gone, but your hair will be tangle-free and light as though using the best conditioner. Apple cider vinegar is recommended, but regular white vinegar works as well.
  • Toothpaste – all you need is baking soda and peppermint oil dissolved in some water. Not only does this clean teeth very well, and not only does it freshen your breath, but it alkalizes the mouth which assists in tooth remineralization.
  • Moisturizer – all you need is extra virgin olive oil. Forget those hand and face lotions with a paragraph of chemical ingredients. Just put olive oil in a dropper bottle, and use three drops for the face after washing, three drops worked into your hair if you don’t like that poofy dry-hair look after showering, some worked onto your scalp if you have an itchy scalp, and as much as needed for the rest of your body. It will make you look healthier. Olive oil does not clog pores and has been known to help reduce acne by keeping the skin oiled so that the skin does not produce as much of its own oil which is what clogs the pores.
  • Hair Gel – all you need is flax seeds boiled in water. Put two tablespoons flax seeds into one cup water, bring to a boil and keep boiling for a minute or two, then strain out the seeds and refrigerate the liquid. The result will be a gooey gel that works as well as any commercial hair gel, except it is all natural and low priced.

So imagine that, with just some soap, baking soda, peppermint oil, vinegar, olive oil, and flax seeds you can take care of your grooming needs without exposing yourself to artificial chemicals. You will save a lot of money using these tricks and look good for it!

Extend the Life of Your Blue Jeans

How to make your jeans last longer?

1) Wash them inside out at cold water, or warm if noticeably dirty. This will preserve the color.

2) Hang them to dry, then tumble in the dryer for a few minutes to soften. This will further preserve the dye and reduce premature fraying. Drying your jeans straight from the washer for an hour is the number one denim destroyer.

3) If there are any frayed edges around the bottom, put some superglue on them.

4) If using the washing machine, use only half the laundry detergent. Detergent manufacturers put misleading instructions telling you to use twice what you actually need in order to sell more products. Half is all that’s necessary. Too much and the cotton itself starts getting digested by the detergent, weakening it. Otherwise it’s best to gently hand-wash jeans in cold or lukewarm water with just a little detergent.

5) Buy jeans made of thicker rougher material. The thinner and softer, the faster it will fray and become holey. 12 ounce material is the thinnest that will stay durable, 13 oz is getting good, 14 oz is ideal, 15 oz is super tough but getting a bit stiff. What are the cheapest durable brands? Levi’s Red Tab, Carhartt, Wrangler, and Dickies.

6) Common sense: avoid the ‘destructed’ types of pants with lots of grinding, abrasion, and holes. They cut the life of your jeans to 1/4th, meaning they are 4x as expensive in the long run as non-destructed jeans. If yours have just a little abrasion around edges and pockets, then follow the nail polish trick. Darker jeans will last longer since they have not been so pre-washed and processed to appear faded.

7) Don’t wash them more than once a week if possible. Jeans are not socks or undershirts or underwear that need to be washed frequently. If the jeans aren’t grimy at the end of the day, they don’t need to be washed yet. It’s doable to have a few pairs that you rotate through, and wash them all once a month.

8) If prickly things or cat’s claws rip little loops or tufts out of your jeans that stick up above the surface of the fabric, stuff them back into the fabric with a thick needle or awl. Otherwise they eventually pull out further and become holes.

9) When you get a stain on your jeans, don’t rub vigorously at the spot with a towel or brush. This will tear away at the fabric and begin the process of unraveling. Rather, dab instead of scrape or rub. Remember that dark jeans don’t show stains as much.

10) The above advice is for your good jeans you want to maintain. But if all you have are good jeans, you’ll be afraid to ever do anything that could ruin them. So to avoid cramping your lifestyle, I suggest also picking up a pair of cheap, thick, rugged, dark jeans to be your “get dirty jeans” for physical work, leisure sports, garage tinkering, car fixing, and so on. Try some Carhartt, Wrangler, or Dickies specially advertised to be tough.

How to shrink jeans (for anyone who wants to know)?

Spray them on the outside with a water bottle, turn them inside out and spray again until uniformly damp, then put into a dryer and run at high heat until they are bone-dry. This will shrink them. Then, to stiffen them up so that they are less likely to expand back through mere wearing, after the dryer just spray them thoroughly inside and out again with tap water until very damp, then hang them up to air dry.

´ - previous posts                 newer posts + ª